
Sitemap is one of the most important parts of a website. When you submit sitemap to Google or any other search engine, it becomes easy for the search engines to discover and index all the pages of your website. The more the number of pages of your website in Google’s index, the better will be your chances for getting free organic traffic. Are you a beginner struggling with how to deal with sitemaps? Don’t worry. In this post today, I’ll be explaining all the fundamentals about sitemaps, how to create one and finally how to submit your sitemap to Google for better search engine visibility.
First: Essential Basics About Sitemaps
1) What is a Sitemap?

As the word itself suggests: A sitemap literally is a map of your website. Like a map tells the viewers about the various places in a geographic area and their relative coordinates, a sitemap analogously tells the search engines about the hierarchical link structure of a website or a blog like main pages, inner pages and blog posts.
2) How does a Sitemap work?

A sitemap works like a coweb, which helps search engines like Google to navigate through this hierarchical structure of links and store pages in its search database. Sitemaps contain vital information like a time-stamp when a page was last updated/modified and update frequency of a particular post or page. This helps search engines to compare these updated/modified web pages with the ones which are already in their index, thereby making it possible for the search engines to intelligently crawl and index your website. It is therefore very important that you create a sitemap and submit it to Google as soon as possible after launching your new website.
3) What are the different types of Sitemap?
On the very basic level, Sitemaps can be of two types: 1) HTML and 2) XML.
HTML Sitemaps
HTML sitemaps are intended for your website readers. It represents a visual hierarchy of various important pages on a website and thereby facilitates easy navigation to all important sections of the website.
XML Sitemaps
On the other hand, XML sitemaps are intended for search engines since they contain information in a format best read and understood by search engines only. If you are wondering how to create such types of sitemaps, don’t worry. I’ll be discussing this part in detail below. Please keep reading.
4) How to see if a website has a Sitemap?
If you are wondering whether your website might already have a sitemap, you can easily check it by either of the following ways:
a) In a web browser, type your website address followed by “/sitemap.xml”
b) Inside Google Search Console, on the left sidebar, you will find “Sitemaps” under Index section. There you can confirm whether your sitemap has already been submitted to Google. If yes, you can simply follow the link to your Sitemap in Google Search Console where it displays “Open Sitemap”.

c) Alternatively, you can also check the existence of your sitemap using various online services.
How to create a Sitemap?
There are two ways to create a sitemap – either manually or through various third-party online tools. Since Google, including all other search engines depend predominantly on XML sitemaps for the reasons best explained in the post above, I’ll share how to create an XML sitemap of your website easily:
Option 1) Create an XML sitemap manually:
Before you create an XML sitemap manually, you must first visualize an overall hierarchy and inter-relationships among all the pages present on your website. Like, for example; the most important page must be your homepage, followed by pages on the top navigation bar, then the inner pages and so on…This visualization is important as it helps in deciding which URLs and with what priority allocation have to be placed inside the sitemap file. Once you are done with this exercise, please follow the steps mentioned below:
Step 1: Open a basic text editor such as MS Word and save this as a (.xml) file.
Step 2: Now use the following code for each URL on your website:
<?xml version=”1.0″ encoding=”UTF-8″?>
<urlset xmlns=”http://www.sitemaps.org/schemas/sitemap/0.9″>
<url>
<loc>http://www.yourwebsite.com/</loc>
<lastmod>2019-01-01</lastmod>
<changefreq>monthly</changefreq>
<priority>0.7</priority>
</url>
</urlset>
The above code is for illustration purpose only. You must replace the necessary fields as per your website only. For more information on this structure, please visit the Protocols section at Sitemaps.org.
Option 2) Create an XML sitemap online
If your website has a large number of pages, it’s better to drop the idea of creating the sitemap manually. There are many useful online tools that serve the purpose in case your website has a large number of pages. Here are the best recommendations:
1) Yoast SEO plugin: If you’re using any popular content management system like WordPress, Yoast SEO plugin offers free sitemap creation as a part of its SEO pack. The plugin is free to download and install on your WordPress site.
2) Screaming Frog: A very popular SEO tool, screaming frog lets you create an XML sitemap for up to 500 pages for free. However, there is an option to upgrade to paid version @180 USD annually which removes all such restrictions. It’s a software which needs to be downloaded and installed on your computer system.
3) Small SEO Tools: Another good alternative to Screaming Frog is Small SEO tools. Imposing the same limit of up to 500 pages, the software lets you create an XML sitemap online for free without requiring you to download any software.
How to upload Sitemap on your website?
Once you’ve your XML sitemap prepared either manually or automatically, it’s time to upload it on your website. You can upload it manually in the home directory of your website through cPanel or you can use FileZilla to automatically transfer the sitemap file to your home directory. Once uploaded, you’ll have your Sitemap URL something like this – yourwebsite.com/sitemap.xml
Please note that if you are using Yoast SEO plugin, you are NOT required to upload anything on your website. Yoast uploads your sitemap in the home directory of your website automatically.
How to submit sitemap to Google:
After you’ve created an XML sitemap for your website, it’s important that you submit sitemap to Google in the correct way. Google Search Console lets you do this effortlessly. To submit your sitemap, follow these steps:
1. Login to Google Search Console. If you don’t have an account, make sure to signup with your existing Google email address and password.

2. Once you are logged in, on the left side you’ll see “Sitemaps” under the Index section.
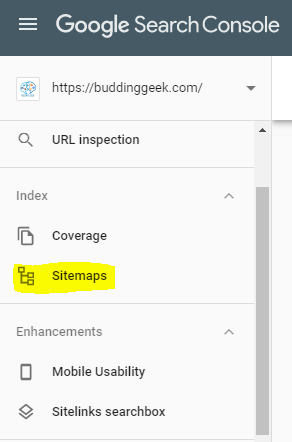
Click on Sitemaps, then add a new Sitemap by entering the complete URL of the sitemap which has been uploaded on your website (for example: yourwebsite.com/sitemap.xml)
3. Click Submit.

4. After you’ve submitted the Sitemap, Google will start crawling and indexing your website as per the instructions provided in the sitemap file.
Things To Do After Submitting Sitemap To Google:
Once you’ve submitted your sitemap, Google will start crawling and indexing your entire website in accordance with the priorities, update frequency and preferences provided by you in the Sitemap file. But your job doesn’t end here. You also have to make sure that once you publish any new content on your website, those changes are reflected and updated in the Sitemap file as well. This ensures that Google discovers your new content as soon as it is published on your website. Here are the two possible course of action that follow in this situation:
1. You update your Sitemap file manually
If you’ve created your sitemap file manually, you will have to add/update all new links in the Sitemap file manually. Once you’ve made the necessary changes in the Sitemap source file, you must re-upload it again to the home directory of your website. Make sure that you do not change the filename and URL else Google will have trouble locating it.
Once you’ve successfully updated your sitemap, it’s time to let Google know about all these changes so that it is able to update/index all such changes in its search database. You can do this by manually sending an update ping to Google. Here is how you can do this:
a) Open your web browser and hit the following URL in this address bar:
http://www.google.com/webmasters/sitemaps/ping?sitemap=http://www.yourwebsite.com/sitemap.xmlGoes without saying, you obviously have to replace the website address shown above with your actual sitemap URL.
b) Once you’ve submitted this Sitemap update ping to Google, you’ll be greeted with an acknowledgement notice by Google. That’s it.
This process seems time consuming, but it makes sense when you’ve a small website with only a few web pages, and you rarely have to update your website.
2. Your Sitemap file is updated automatically
When you use Yoast SEO plugin for automatically creating your sitemap, each and every change that happens on your website is automatically updated in the sitemap file. Yoast also pings Google each time you make such changes so that the updates are picked up by the search engine as soon as possible. Everything happens seamlessly in the background without you even knowing that it is actually happening!
Still have questions? Please ask.
Now that you’ve understood how to successfully create and submit sitemap to Google, it’s time to implement this detailed guide on your own website. Let me know how well did it go. Should you have any questions/doubts, feel free to drop your comments below. Have a delightful day! 🙂
Can we have two sitemaps of a website at the same time?
This is what I call a very clean, structured and marvellous piece of content. Very beautifully explained.
Thank you so much, Peter. Your comment has made my day!
This post explained everything I wanted to know about Sitemaps. Brilliant Abhishek! Thanks for sharing.
Thank you, Derek!